Our Location
304 North Cardinal St.
Dorchester Center, MA 02124
304 North Cardinal St.
Dorchester Center, MA 02124


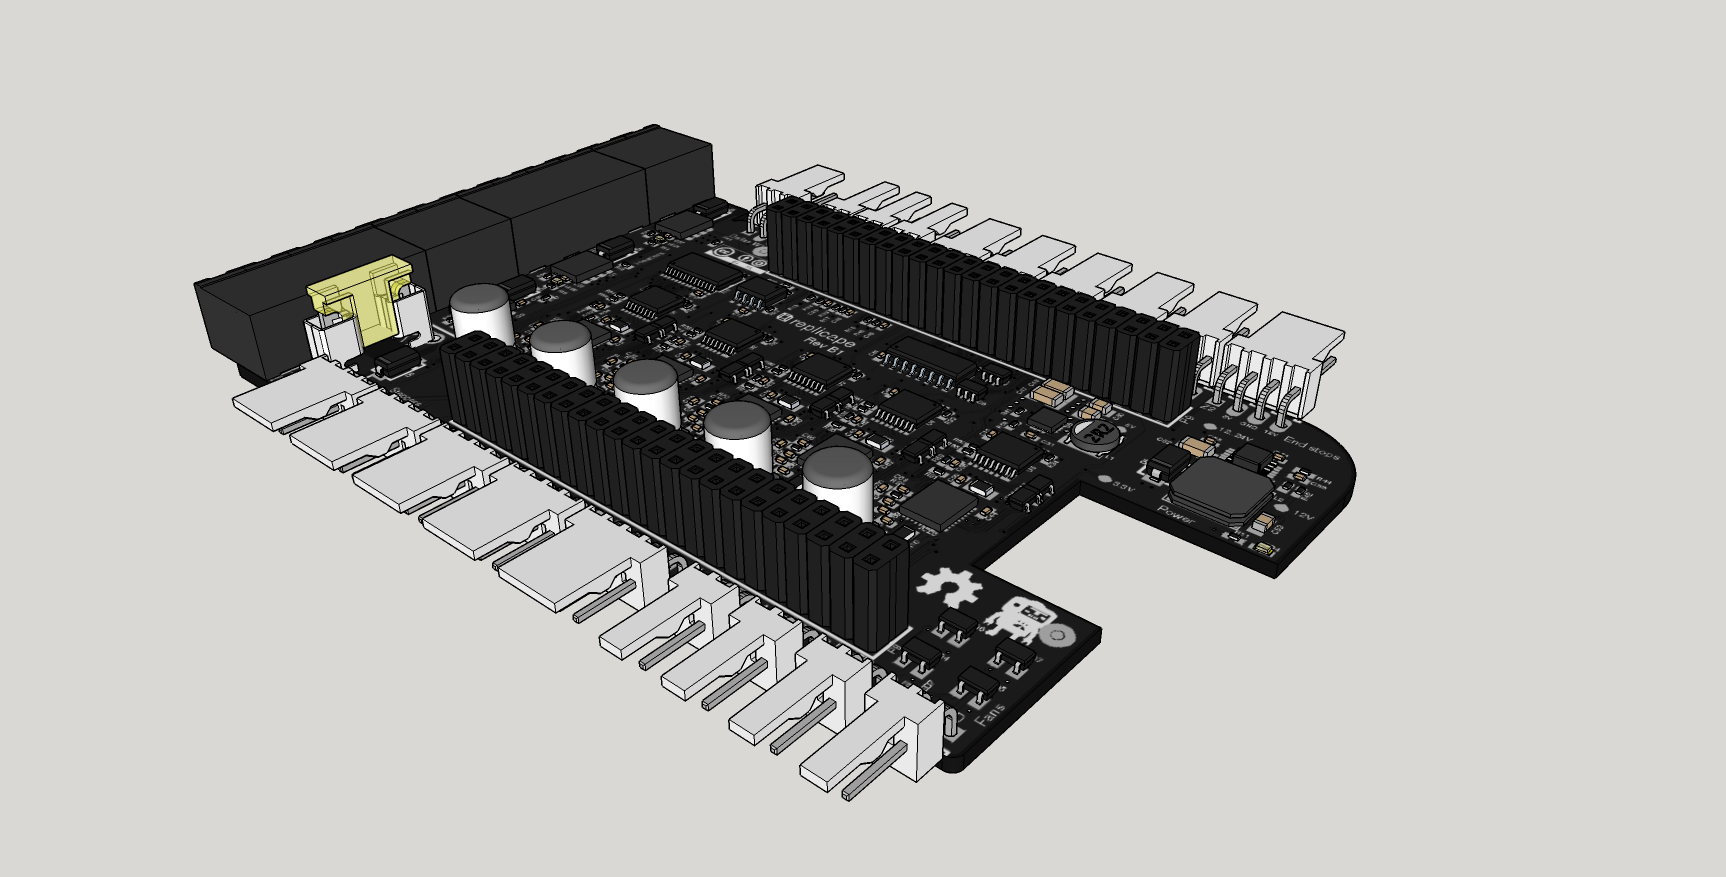
So I’ve recently started working on a new major revision of Replicape, rev B! And boy is it major in many ways! First of all, the stepper drivers are brand new, I’m going for the TMC2100 which have gotten a lot of buzz lately because of their many configurations for lower noise.
Don’t believe the hype though, even though they are super silent with the StealthChop, that mode is all but useless for 3D-printing. Still, they offer a few more options for tuning the audible noise level, which I’m really looking forward to playing around with. Other than that, one of the major improvements is the price point. By changing manufacturer (see below), opting for a higher volume, doing some electronics voodoo (eliminating the DAC by leveraging some spare channels on the PWM chip etc.), the MSRP of $99 looks like it can be achieved as hoped. This does not mean that the board will be a worse product, quite the opposite. For this price, I’ve managed to add
– Brand new stepper drivers (TMC2100) for up to 256 times microstepping. (actually they are cheaper than DRV8825s)
– input protection on all end stops enabling up to 15V inputs (so you can use proximity sensors directly on end-stops
– reverse polarity protection on input (in case you get unlucky)
– four layer PCB giving lower EMC noise levels
– lower audible noise levels (ground return noise increased the audible levels)
– an additional fan output
– PWM enable (in conjunction with the Watchdog, increases safety in case of a kernel panic)
– Two 5V servo outputs, so you can add a physical Z-probe or Dual drive extruder (http://www.dglass3d.com/products/hpx2max/).
A second thing I’m excited about is the cooperation with Elmatica on the new revision prototypes. These guys have over 40 years of experience in the PCB business and they have been kind enough to do me a solid and help with the prototypes pro-Bono. They are also hooking me up with some sweet connections for the PCB production over in China, so the new boards will be top quality at a low price. In their words: “We’ll hook you up with someone who will not screw you over!”. Music to my ears. In fact, hearing that, I sort of felt like Jules in Pulp Fiction when Marcellus offers to send The Wolf. (See image below).

The plan now is to do a little prototyping for a few weeks and then kick off a Kickstarter to get the volume up to at least a couple of hundred boards which should enable a batch size of 500. By that time, the new Kamikaze CNC image should be stable with a Redeem V1.0
I’m very interested. Let me know what needs to be done.
Well, if you tried to support Machinekit (or more update the component https://github.com/sam0737/machinekit-replicape/tree/master/ARM.Replicape.A4A which was published recently), you would certainly get more people on board. Myself included.
Among a few BBB cape’s available for 3DP, I love Replicape most. I don’t like Polulu module and Replicape surely got the job done nicely.
After evaluation I decided sticking with Machinekit for now to enjoy the hackability. Their HAL system is unbeatable.
That’s something I would recommend to my local community and I hope the Rev B would be selling anytime soon. 🙂
Sam, I’ve seen the job you’ve done with making Replicape A4A compatible with MachineKit! Awesome job! It should not be much work to get the new board working on MachineKit as well!
Hello. I am attempting to get the Replicape working with Machinekit as well but I am completely lost. I am trying to run a 4’x 4′ Shapeoko CNC with 3.2A steppers. Not familiar with Linux. I managed to get the Kamikaze image working on the BeagleBone’s flash memory. As I understood though, Redeem does not support dual Y axis setups with large current motors.
Anyway, on an microSD I have the stock Beaglebone running Machinekit. However whenever I open the replicape sample configuration the Machinekit logo simply appears then disappears.
Again, I am not very familiar with Linux CNC or Linux and there is no sort of comprehensive guide.
I am documenting my build and can document the software setup process when its done.
Any help would be greatly appreciated.
email: mr.solis93 at yahoo dot com
Hi! Great that you are trying to get this working with Machinekit and Shapeoko!
I’m not sure what you mean by “the logo appears then disappears”, do you mean on a screen you have connected?
What does the logs say? I’m not sure where it is logged, but at least check “journalctl –follow -n100” or systemctl status machinekit.service (or similar).
Hi!
I have my BeagleBone connected via HDMI to a monitor.
I am not sure how to get the logs you specified.
However when I run LinuxCNC from terminal, I get this:
Starting Machinekit…
io started
emc/iotask/ioControl.cc 752: cant’t load tool table.
halcmd loadusr io started
BB-BONE-REPLICAP overlay not found
replicape.hal:10: program ‘./setup.sh’ failed, returned 1
Shutting down and cleaning up Machinekit…
Cleanup done
Not sure if its the same as the logs you are referring to.
Problem with overlay? I remember going over that in the Redeem setup.
Not sure if I did it correctly.
I very much like your Replicape and I think this is the best solution for DIY 3D printer. I plan to use the Replicape for creation of a 3D printer using C-Bot design (http://openbuilds.com/builds/c-bot.1146/). I am a beginner in this and want to ask you several questions.
1. When do you plan to start the project on kikstarter? I do not want to accidentally skip it. Is there the way to subscribe to news? Perhaps you will use prefundia.com or some analogue for it?
2. I am slightly worrying because of power of new stepper drivers (up to 1.7A coil current and 2.5A peak). I plan to use these NEMA 17 stepper motors (http://openbuildspartstore.com/nema-17-stepper-motor/) which require 1.68 A power. I think I will not be able to use two these motors parallel on one driver, right? (I suspect in my case I can use two less power motors for the Z axis in parallel, but I yet little know about it to know exactly).
How to at all control powerful step motors, of requiring current at 3 A and more? Do special drivers for them exist or it is possible to use external MOSFET?
3. And, if I have to use two drivers for a Z axis, I keep only one driver for an extruder. I planned to use two extruders, or even to experiment with multicolor printing. I know you were developing a Reach expansion board just for such cases. Do you plan to do a new revision of this board and will it be available for an order?
Thanks.
Hi! Your printer looks great!
1) I’m working on assembling and testing the first prototype now, after that there will be ~10 beta boards (which will be distributed to some lucky guys) and then the final production batch. I’m hoping to get the Kickstarter launched some time this summer!
2) The steppers you are referring to do not “require” 1.68A, that is likely what they are rated for without overheating. You can probably get away with much less current than that, especially if you are using them for the Z-axis which is often highly geared.
3) You can use a single driver for the Z-axis, so you can have both extruders available if you want!
But what about the Reach project? Is it alive?
Reach will need to be redesigned since the old Reach is no longer compatible with the new board. But it will be mostly a copy-paste of the design, so it should not be that big of a job.
The good news is that the new Reach will not be dependent on any input from Replicape (separate external connector supplying PWM + ADC) as was the case with the old version, but instead will be more stand alone and should function as a separate cape with 3 axes.
[…] image also has the ADC bug removed that was present in the last release. There is also support for Replicape Rev B1, of which there only exists one prototype 🙂 This image also has Linux kernel 4.1.0-bone9 with cape […]
[…] Replicape Rev B, I've opted to cut out the gate drivers on the MOSFETs in favour of having the gates driven […]
Any news about KS project?
Yes, Betatester units were shipped out on Thursday and today. I’ll make a new blog pot about it!
HI,
I was wondering if the stepper drivers have breakout pins to allow for running different stepper drivers? I will be running much larger stepper motors with remote drivers on a large printer I am assembling. My original design was around a smoothieboard but using a Beaglebone black and the repilcape seems like a more powerful setup for future expansion.